- A staggered animation consists of sequential or overlapping animations.
- To create a staggered animation, use multiple
Animationobjects. - One
AnimationControllercontrols all of theAnimationobjects. - Each
Animationobject specifies the animation during anInterval. - For each property being animated, create a
Tween.
If the concept of tweens or tweening is new to you, refer to the Animations in Flutter tutorial.
happen as a series of operations, rather than all at once. The animation might be purely sequential, with one change occurring after the next, or it might partially or completely overlap. It might also have gaps, where no changes occur.
This guide shows how to build a staggered animation in Flutter that applies a series of sequential and overlapping animations to a single widget. Tapping the screen begins an animation that changes opacity, size, shape, color, and padding.
The following video demonstrates this staggered animation:
In the video, you see the following animation of a single widget, which begins as a bordered blue square with slightly rounded corners. The square runs through changes in the following order:
- Fades in
- Widens
- Becomes taller while moving upwards
- Transforms into a bordered circle
- Changes color to orange
After running forward, the animation runs in reverse.
This page assumes you know how to create a layout using Flutter's widgets. To learn more, visit Building Layouts in Flutter.
- All of the animations are driven by the same
AnimationController. - Regardless of how long the animation lasts in real time, the controller's values must be between 0.0 and 1.0, inclusive.
- Each animation has an
Intervalbetween 0.0 and 1.0, inclusive. - For each property that animates in an interval, create a
Tween. TheTweenspecifies the start and end values for that property. - The
Tweenproduces anAnimationobject that is managed by the controller.
staggered animation example. You might notice the following characteristics:
- The opacity changes during the first 10% of the timeline.
- A tiny gap occurs between the change in opacity and the change in width.
- Nothing animates during the last 25% of the timeline.
- Increasing the padding makes the widget appear to rise upward.
- Increasing the border radius to
75.0transforms the150.0x150.0square with rounded corners into a circle. - The padding and height changes occur during the exact same interval, but they don't have to.
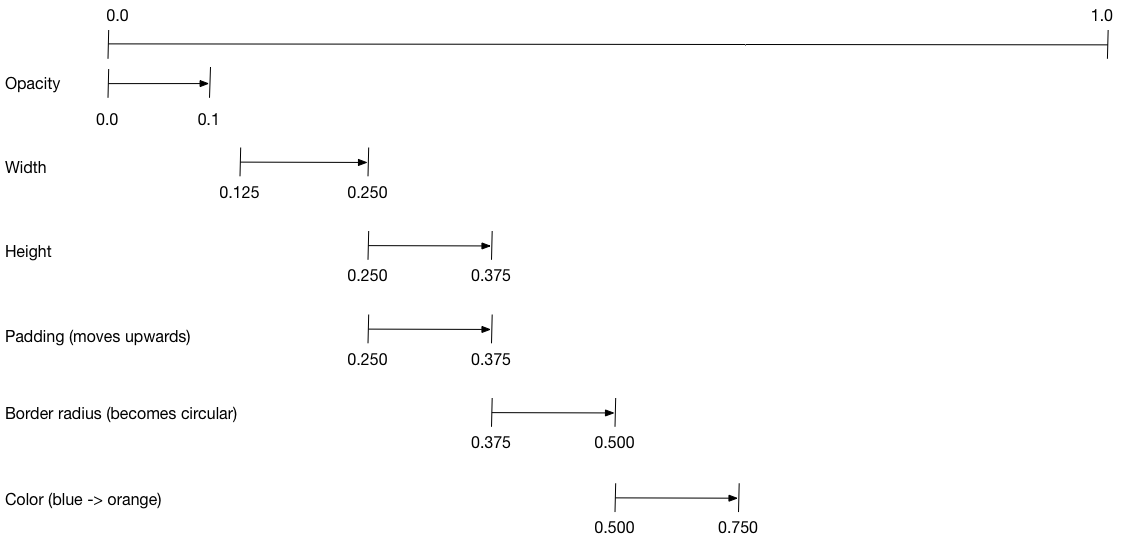
To set up the animation:
- Create an
AnimationControllerthat manages all of theAnimationobjects. - Create a
Tweenfor each property being animated.- The
Tweendefines a range of values. - The
animate()method ofTweentakes a parent animation and produces anAnimationfor that property.
- The
- Specify the interval with the
curveproperty ofCurvedAnimation.
When the controlling animation's value changes, the new animation's value changes, triggering the UI to update.
The following code creates a tween for the width property.
It builds a CurvedAnimation, specifying an eased curve.
For other available predefined animation curves, consult Curves.
width = Tween<double>(begin: 50, end: 150).animate(
  CurvedAnimation(
    parent: controller,
    curve: const Interval(0.125, 0.250, curve: Curves.ease),
  ),
),
The begin and end values don't have to be doubles.
The following code builds the tween for the borderRadius property
(which controls the roundness of the square's corners),
using BorderRadius.circular().
borderRadius =
    BorderRadiusTween(
      begin: BorderRadius.circular(4),
      end: BorderRadius.circular(75),
    ).animate(
      CurvedAnimation(
        parent: controller,
        curve: const Interval(0.375, 0.500, curve: Curves.ease),
      ),
    ),
Complete staggered animation
Like all interactive widgets, the complete animation consists of a widget pair: a stateless and a stateful widget.
The stateless widget specifies the Tween objects,
defines the Animation objects, and provides a build() function
responsible for building the animating portion of the widget tree.
The stateful widget creates the controller, plays the animation, and builds the non-animating portion of the widget tree. The animation begins when a tap is detected anywhere on the screen.
App source: staggered animation example
Stateless widget: StaggerAnimation
In the stateless widget, StaggerAnimation,
the build() function instantiates an
AnimatedBuilder—a general-purpose widget for building animations.
The AnimatedBuilder builds a widget and configures it
using the current values of the Animation objects.
The example creates a function named _buildAnimation() (which performs
the actual UI updates), and assigns it to its builder property.
AnimatedBuilder listens to notifications from the animation controller,
marking the widget tree dirty as values change.
For each tick of the animation, the values are updated,
resulting in a call to _buildAnimation().
animated properties in a single builder. When animating opacity on its own,
prefer FadeTransition to avoid rebuilding the child widget on each frame.
import 'dart:async';
import 'package:flutter/scheduler.dart' show timeDilation; import 'package:material_ui/material_ui.dart';
class StaggerAnimation extends StatelessWidget { StaggerAnimation({super.key, required this.controller}) : // Each animation defined here transforms its value during the subset // of the controller's duration defined by the animation's interval. // For example, the opacity animation transforms its value during // the first 10% of the controller's duration. opacity = Tween(begin: 0, end: 1).animate( CurvedAnimation( parent: controller, curve: const Interval(0, 0.100, curve: Curves.ease), ), ),
  width = Tween<double>(begin: 50, end: 150).animate(
    CurvedAnimation(
      parent: controller,
      curve: const Interval(0.125, 0.250, curve: Curves.ease),
    ),
  ),

  height = Tween<double>(begin: 50, end: 150).animate(
    CurvedAnimation(
      parent: controller,
      curve: const Interval(0.250, 0.375, curve: Curves.ease),
    ),
  ),

  padding =
      EdgeInsetsTween(
        begin: const EdgeInsets.only(bottom: 16),
        end: const EdgeInsets.only(bottom: 75),
      ).animate(
        CurvedAnimation(
          parent: controller,
          curve: const Interval(0.250, 0.375, curve: Curves.ease),
        ),
      ),

  borderRadius =
      BorderRadiusTween(
        begin: BorderRadius.circular(4),
        end: BorderRadius.circular(75),
      ).animate(
        CurvedAnimation(
          parent: controller,
          curve: const Interval(0.375, 0.500, curve: Curves.ease),
        ),
      ),

  color = ColorTween(begin: Colors.indigo[100], end: Colors.orange[400])
      .animate(
        CurvedAnimation(
          parent: controller,
          curve: const Interval(0.500, 0.750, curve: Curves.ease),
        ),
      );
final Animation controller; final Animation opacity; final Animation width; final Animation height; final Animation padding; final Animation<BorderRadius?> borderRadius; final Animation<Color?> color;
// This function is called each time the controller "ticks" a new frame. // When it runs, all of the animation's values will have been // updated to reflect the controller's current value. Widget _buildAnimation(BuildContext context, Widget? child) { return Container( padding: padding.value, alignment: Alignment.bottomCenter, child: Opacity( opacity: opacity.value, child: Container( width: width.value, height: height.value, decoration: BoxDecoration( color: color.value, border: Border.all(color: Colors.indigo[300]!, width: 3), borderRadius: borderRadius.value, ), ), ), ); }
@override Widget build(BuildContext context) { return AnimatedBuilder(builder: _buildAnimation, animation: controller); } }
### Stateful widget: StaggerDemo

The stateful widget, `StaggerDemo`, creates the `AnimationController`,
specifying a 2000 ms duration. It plays the animation,
and builds the non-animating portion of the widget tree.
The animation begins when a tap is detected on the screen.
The animation runs forward, then backward.
Taps during playback are ignored so the sequence can finish.


```dart highlightLines=1,28,32-33,40
class StaggerDemo extends StatefulWidget {
  const StaggerDemo({super.key});

  @override
  State<StaggerDemo> createState() => _StaggerDemoState();
}

class _StaggerDemoState extends State<StaggerDemo>
    with SingleTickerProviderStateMixin {
  late final AnimationController _controller;

  @override
  void initState() {
    super.initState();

    _controller = AnimationController(
      duration: const Duration(milliseconds: 2000),
      vsync: this,
    );
  }

  @override
  void dispose() {
    _controller.dispose();
    super.dispose();
  }

  Future<void> _playAnimation() async {
    if (_controller.isAnimating) return;

    try {
      await _controller.forward().orCancel;
      await _controller.reverse().orCancel;
    } on TickerCanceled {
      // The animation got canceled, probably because it was disposed of.
    }
  }

  @override
  Widget build(BuildContext context) {
    return Scaffold(
      appBar: AppBar(title: const Text('Staggered Animation')),
      body: GestureDetector(
        behavior: HitTestBehavior.opaque,
        onTap: _playAnimation,
        child: Center(
          child: Container(
            width: 300,
            height: 300,
            decoration: BoxDecoration(
              color: Colors.black.withValues(alpha: 0.1),
              border: Border.all(color: Colors.black.withValues(alpha: 0.5)),
            ),
            child: StaggerAnimation(controller: _controller.view),
          ),
        ),
      ),
    );
  }
}

void main() {
  timeDilation = 10; // 1 is normal animation speed.
  runApp(const MaterialApp(home: StaggerDemo()));
}